Editing Tips for Stunning Autumn Photos- Lightroom Tutorial / Part 2
- @chiarik22

- Nov 26, 2020
- 4 min read
Updated: Nov 27, 2020
There are so many reasons to visit Tovel's Lake in the Brenta Dolomites. Its unique landscapes, the blue and green waters, different and spectaculare reflections... but if you're so lucky to see it in Autumn you hardly forget its incredible colors in this season. The oranges of the trees in contrast with the blue turquoise color water will make you dream... You have to trust me, that's defenitely a great location to take stunning pictures in this season!! 🍁✨
In today's tutorial we're going to be relying on HSL panel as well as some other editing tools in Adobe Lightroom CC to make fall/autumn scenery stand out, by bringing out as much of that natural colour as possible! This is the second part of a tutorial on How to get the perfect autumn look in your photos - Lightroom Tutorial / Part 1, in which you have seen how to make a Basic Autumn Preset.
I'm going to show you here how I have adjusted the Basic Autumn Preset to suit my photo to create very impressive content for my Instagram feed:

Step 1: Before we start
There are some considerations before you start an editing in order to optimize any adjustements you're going to make on your photo. In this picture below, due to the meteo conditions, we find that the water color is off. So, we need to revive it and boost its tipical blue turquoise color:

Even the foliage colors need to be enhanced. The more we'll boost the oranges, the yellows and the greens of the trees and the more is the contrast with the blue color of the lake.
Ok, here we are!!
Step 2: Fix the autumn settings
First, use the VERYBLUR Basic Autumn Preset for the starting adjustments on your photo or apply all settings seen in my previous post How to get the perfect autumn look in your photos with Lightroom CC. Look at the result:

Not bad, but we need more adjustments... as we are looking for a more STUNNING AUTUMN EFFECT here... but how to make it?
Step 3: Basic Panel adjustments
Just to get started, here below are some new regulations to be changed:
Exposure -20, highlights -9, blacks -15.

Then, we need lower color temperatures (temperature 5.762), and a little bit more greens (tint +11). We want also to strengthen the intensity of the color by increasing Vibrance (0) and Saturation (+46).
Step 4: Setting Camera Calibration
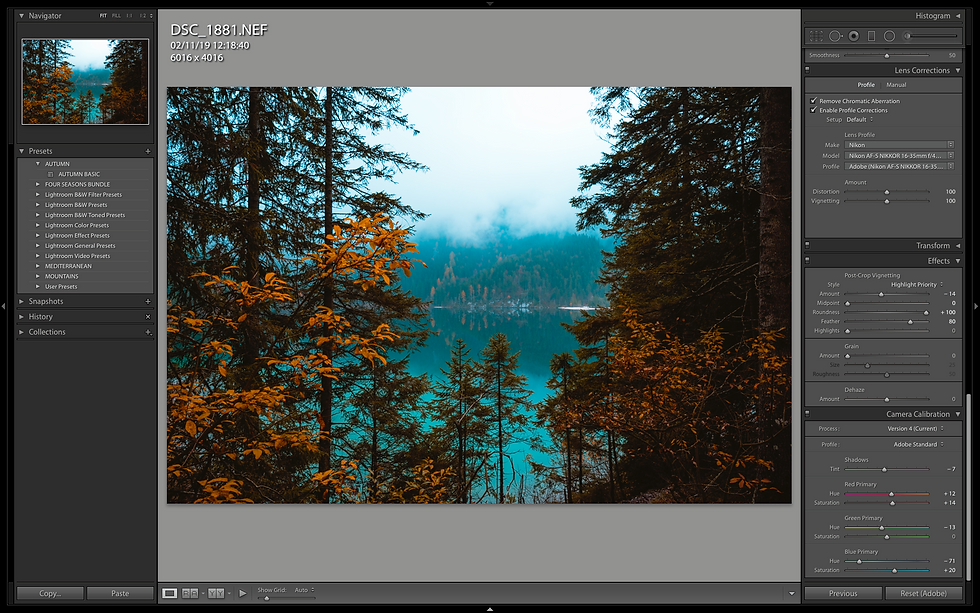
Camera Calibration is an incredible tool in Adobe Lightroom for extracting more color from your photos. So, as I want to boost the blue turquoise color of the water, I can start adjusting the Blue Primary, and something insane will happen... look:

Here are new settings to be changed:
BLUE PRIMARY: hue -71, saturation +20
GREEN PRIMARY: hue -13, saturation 0
TINT SHADOWS: -14.
Step 5: Adjust the colors in HSL Panel
The water color is great, but we need to boost now the hue and saturation of the oranges, the yellows and the greens. HSL (HUE, SATURATION, LUMINANCE) panel is another powerful tool that allows you to control different colors independently. By adjusting settings here you can better arrange each color of your image.


Well done, you’re there!
And this is what our photo looks like now:

Step 6: Using the Radial Filter
And now the Radial Filter..., this is such a magical tool, I love it!!
This tool is a kind of elliptical mask that allows you to make local adjustments including temperature, exposure, contrast and vary many others basic settings. That is exacltly what we need to use here on our photo: desaturating the upper part and increasing exposure and highlights on the lower part. By using this tool both the actions are very easy!!
The red area is where the radial filter settings are active.
By applying the first filter on this photo we can decrease the exposure (-0,34), highlights (-35), dehaze (-8), saturation (-87) and increase the blacks (+11).
While applying the other filter we can adjust settings in the lower part of our image: temperature(-30), exposure (+0,72), highlights (+37) and saturation (+35).
Et le voilà:

Step 7: Final adjustements
Almost done guys!
By adjusting the Tone Curve, you can make your images brighter or darker, and affect the contrast levels. First, increase hilights (+20) and lights (+23), and lower the darks (-19) and shadows (-5). On that way we can get more contrast.

Next, enter Chanel View by clicking the curved line in the bottom right-hand corner. Reduce a little the fade effect by shifting the first anchor point on the Tone Curve in the bottom left-hand corner.

Finally, adjust a little bit the exposure (-70), and your STUNNING AUTUMN EFFECT is done !!
Look here below at the before and after photos (details):

What do you think guys? Leave me a comment below, I will be happy to hear from you ! 🤩🤩
Step 7: Create a Preset
After you made the edits, you may want to save your work as a preset so that you can quickly apply it to other photos!

Click on the (+) in the Preset panel on the left of the screen, and then give your preset a name.
Here’s the tutorial video for more instructions about How to install Lightroom Presets
Do you have any questions or comments about How to edit Autumn Photos with free Lightroom Mobile ? Subscribe and leave me a comment below, I will be happy to hear from you !
And if you like this post, please share it using the social sharing bottons !! 🧡🍁🤩
– Chiarik22 ♡


Comments